
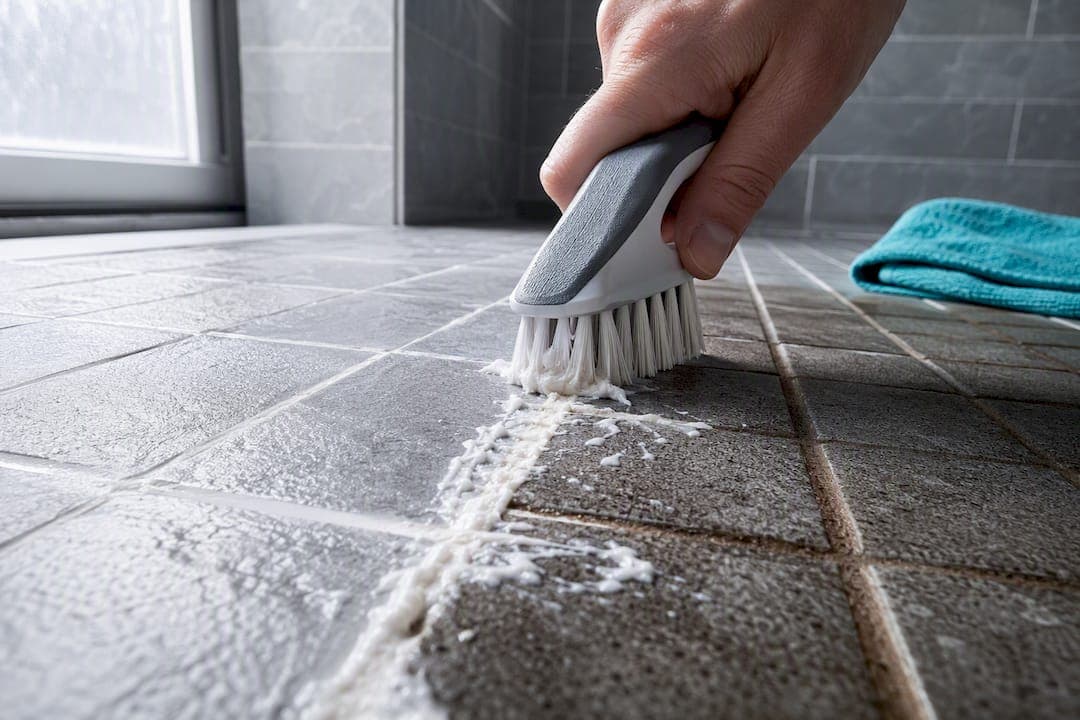
For most grout stains, mix baking soda and hydrogen peroxide into a paste, let it sit for 10 to 15 minutes, then scrub with a nylon brush. If the stain is a mineral deposit like hard-water buildup, an alkaline cleaner works better. Skip acids entirely on cementitious grout and natural stone tile. Once that first pass is done, the method below covers exact ratios, dwell times, and what to do when the stain won't budge.
TL;DR:
- Use baking soda and hydrogen peroxide paste for organic stains like soap scum and mildew, applying in small sections for active cleaning.
- Avoid frequent acid cleaning with vinegar on natural stone or grout, as it can cause damage; test on hidden areas first.
- Deep cleaning requires proper prep, dwell time, careful scrubbing, thorough rinsing, and complete drying to prevent mold recurrence.
- Mechanical tools like oscillating multi-tools and wet/dry vacuums significantly reduce cleaning time for large or stubborn grout areas.
- Reserve professional cleaning for crumbling grout, persistent mold, or large spaces where DIY methods repeatedly fail.
Table of Contents
- Which household products clean grout fast?
- How do you deep clean grout step by step?
- What tools actually make grout cleaning easier?
- How do you remove specific grout stains?
- How do you keep grout clean once it's done?
- When should you call a professional grout cleaner?
- What does an experienced cleaning team actually check that homeowners miss?
- Why most grout advice skips the one thing that actually determines whether it works
- Ready to skip the scrubbing? Here's how Cleaning.Miami helps
- Sources
Which household products clean grout fast?
Most grout stains respond to whatever's already under your sink. The trick is matching the product to the stain instead of grabbing the strongest thing in the cabinet.
The baking soda and hydrogen peroxide paste is the workhorse for organic staining: soap scum, body oil, general grime, light mildew. Mix two parts baking soda to one part hydrogen peroxide until it forms a spreadable paste, about the consistency of toothpaste. Apply it directly onto the grout lines with an old spoon or a grout brush, and let it dwell for several minutes. Don't let it dry out. If you're working in a hot bathroom or under a ceiling fan, mist it lightly with water halfway through so it stays active. Scrub in small circles, then wipe clean with a damp cloth.
For grout that's just dingy rather than stained, a plain baking soda and water paste does the job without the extra oxidizing power. It's gentler, which matters if you're cleaning grout daily or weekly and don't want to wear down the surface over time. Save the peroxide version for actual stains, not routine touch-ups.
Vinegar gets recommended constantly online, and it's worth being straight about why that's often bad advice. Vinegar is acidic, and the Tile Council of North America warns that acid cleaners can dissolve cement grout over repeated use, plus acids should never touch natural stone. If your tile is glazed porcelain or ceramic with standard cementitious grout, a diluted vinegar solution used occasionally usually won't cause visible harm, but test it on a small hidden section first and don't make it a weekly habit. If you have marble, travertine, limestone, or any natural stone, leave the vinegar in the kitchen.
Mold and mildew need different chemistry altogether. Oxygen-based bleach breaks mold down at a molecular level instead of just bleaching the surface white, which is why it tends to outperform chlorine bleach for anything beyond cosmetic discoloration. Chlorine bleach can make black mold look gone while leaving the root structure intact, so it comes back within weeks. Oxygen bleach costs a little more effort (usually a longer soak) but gives you a cleaner result that holds.
- Baking soda + hydrogen peroxide: best for organic stains, soap scum, general grime
- Baking soda + water: best for light dirt, routine maintenance, sensitive tile
- Diluted vinegar: only on glazed porcelain/ceramic, never on natural stone, test first
- Oxygen bleach: best for mold, mildew, and deep discoloration
Pro Tip: Apply your paste in sections no larger than a few square feet at a time. Working smaller means the paste stays wet and active the whole time you're scrubbing, instead of drying out on the far end while you finish the near end.
How do you deep clean grout step by step?
A one-time deep clean follows a different rhythm than a quick wipe down, and skipping steps is the main reason DIY grout cleaning disappoints people. The process breaks into five stages: prep, cleaner selection, dwell, mechanical scrubbing, and extraction with drying.
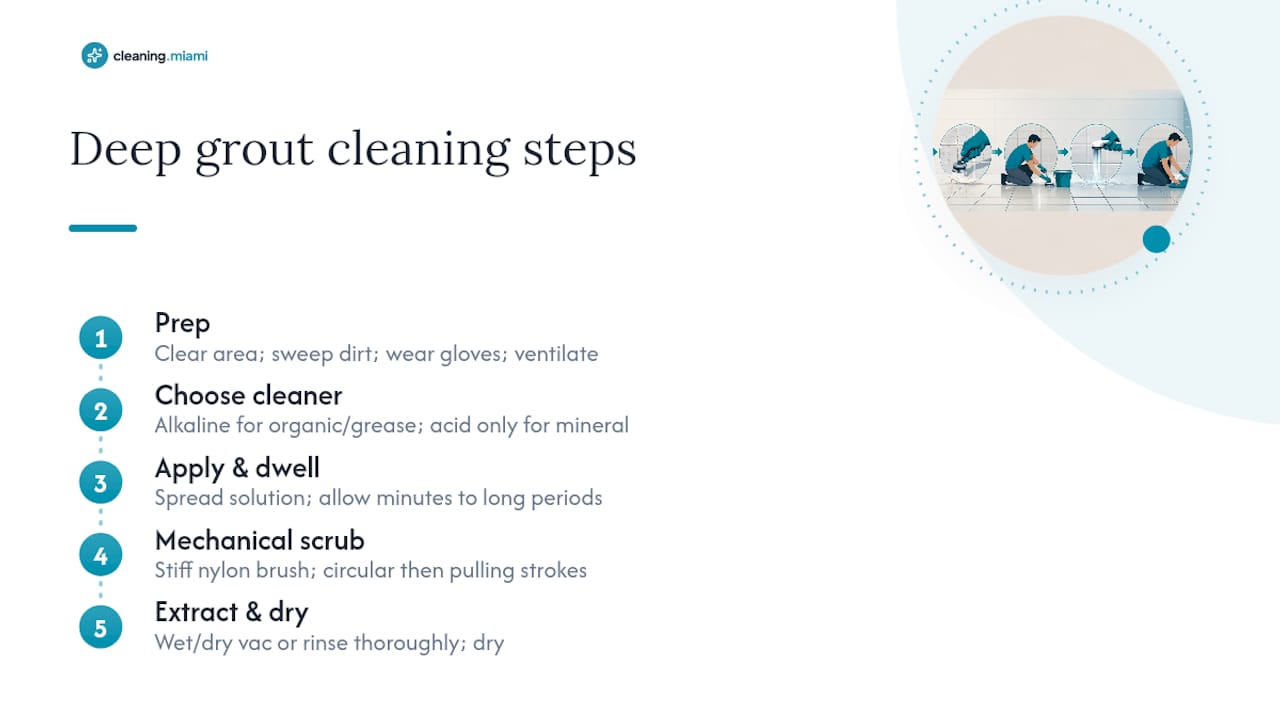
Start with prep. Clear the floor or shower of mats, bottles, and anything else in the way. Sweep or vacuum loose dirt and hair. This matters more than people expect. Grit left on the tile turns into a light abrasive during scrubbing that can dull glazed surfaces. Put on rubber gloves and, if you're using any bleach product, eye protection. Crack a window or turn on the exhaust fan before you open any cleaner. Cover nearby fixtures if you're working with a stronger chemical, since splashes on chrome or brass fixtures can etch the finish.
Choose your cleaner based on the stain, not habit. This is where the TCNA's guidance becomes genuinely useful rather than just a disclaimer. Alkaline cleaners go first, always, for organic and greasy soils, which covers the vast majority of household grout problems. Acid cleaners are reserved strictly for mineral deposits like hard-water scale, and only on tile that can safely tolerate them, which excludes natural stone entirely. Using the wrong chemistry doesn't just fail to clean; it can actively etch or weaken the grout, according to cleaning industry comparisons of DIY versus professional grout treatment.
Apply and let it dwell. Spread your chosen paste or solution over the grout lines and give it time to work. Light staining needs some minutes. Moderate staining, the kind that's been building for a few months, needs longer. Heavy, set-in staining can need a considerable amount of time, and you may need to remoisten the area partway through so it doesn't dry and lose contact with the grout.
Scrub with the right motion and the right brush. A stiff nylon brush is the standard tool here, whether it's a dedicated grout brush or a firm-bristled toothbrush for tight corners. Work in a circular motion first to break up the grime, then switch to short pulling strokes along the length of the grout line to lift debris out of the texture rather than pushing it deeper in. Never use steel wool or metal scouring pads. They scratch glazed tile permanently and can leave metal particles that rust later.
Extract and rinse thoroughly. This step gets skipped constantly, and it's a mistake. Wiping cleaner off with a dry towel leaves dissolved soil and cleaning residue sitting right back in the grout pores. A wet/dry vac pulls loosened dirt and moisture out in one pass, which is the same principle behind commercial extraction systems used on large tile floors. At home, a few thorough rinses with clean water and a fresh microfiber mop head accomplish the same thing on a smaller scale. Rinse until the water runs clear.
Dry completely before you move on. Professionals treat drying as part of the cleaning process, not an afterthought, because damp grout is exactly the environment mold needs to restart. Point a fan at the area or run your exhaust fan, and don't apply sealer to grout that's still holding moisture. Sealer trapped over damp grout traps the moisture underneath it, which defeats the purpose entirely.
One dwell-time detail worth remembering: grout that's been stained for over a year typically needs the full 30-minute soak, sometimes repeated twice, because the staining compounds have had time to bond with the porous cement structure rather than just sitting on top of it.
What tools actually make grout cleaning easier?
The right tool matters less than people assume for light jobs and matters enormously for big ones. A bathroom shower stall doesn't need power equipment. A whole kitchen floor with years of buildup usually does.
Manual tools cover most household jobs on their own. A dedicated grout brush, with its narrow head and stiff nylon bristles, fits the width of standard grout lines better than a generic scrub brush. A toothbrush handles corners, edges, and tight spots around fixtures where a full-size brush can't reach. A grout rake, which looks like a small serrated blade on a handle, is for physically removing crumbling or deeply blackened grout before regrouting, not for routine cleaning.
Powered tools earn their cost on bigger or harder jobs. An oscillating multi-tool fitted with a grout blade attachment can cut cleaning time dramatically on a large floor, since it does the scrubbing motion for you at a speed no wrist can match. Consumer steam cleaners loosen grime with heat and moisture instead of chemicals, which works well on grease and general grime but has limits on deep mineral staining or mold that's penetrated below the surface.
For serious extraction, the gap between consumer and commercial equipment is real. A household wet/dry vac handles rinse water on a bathroom floor fine. The spray-and-vac systems used commercially flush and vacuum grout lines in the same motion, which is why they outperform mopping on large tile areas where residue buildup is a constant problem.
- Nylon grout brush: everyday scrubbing, fits standard grout line width
- Toothbrush: corners, edges, tight spots around fixtures
- Grout rake: removing failing or crumbling grout before regrouting
- Oscillating multi-tool with grout blade: large floors, saves significant scrubbing time
- Consumer steam cleaner: grease and general grime, limited on deep mineral or mold staining
- Wet/dry vac: rinse water extraction after deep cleaning
If you're facing more than one room or grout that's been neglected for years, renting a multi-tool for an afternoon usually costs less than the hours you'd spend hand-scrubbing the same result.
How do you remove specific grout stains?
Different stains need different chemistry, and this is where most DIY attempts go wrong. People apply their one go-to cleaner to every stain regardless of what's actually causing it.
Mold and mildew respond best to an oxygen bleach paste left to dwell for 15 to 20 minutes, sometimes longer on established black spots. Ventilate the room well while it works, since oxygen bleach still off-gasses somewhat as it breaks down organic material. Rinse thoroughly afterward and follow up with a light sanitizing pass once the area is dry.
Hard-water and limescale deposits are mineral, not organic, so alkaline cleaners barely touch them. This is one of the few cases where a mild acid earns its place, but only on tile confirmed safe for it. Never use it on natural stone. For heavy limescale buildup, mechanical scraping with a plastic tool alongside the acid treatment usually works faster than chemistry alone, and persistent scale despite repeated treatment often means it's time to call a professional with stronger equipment.
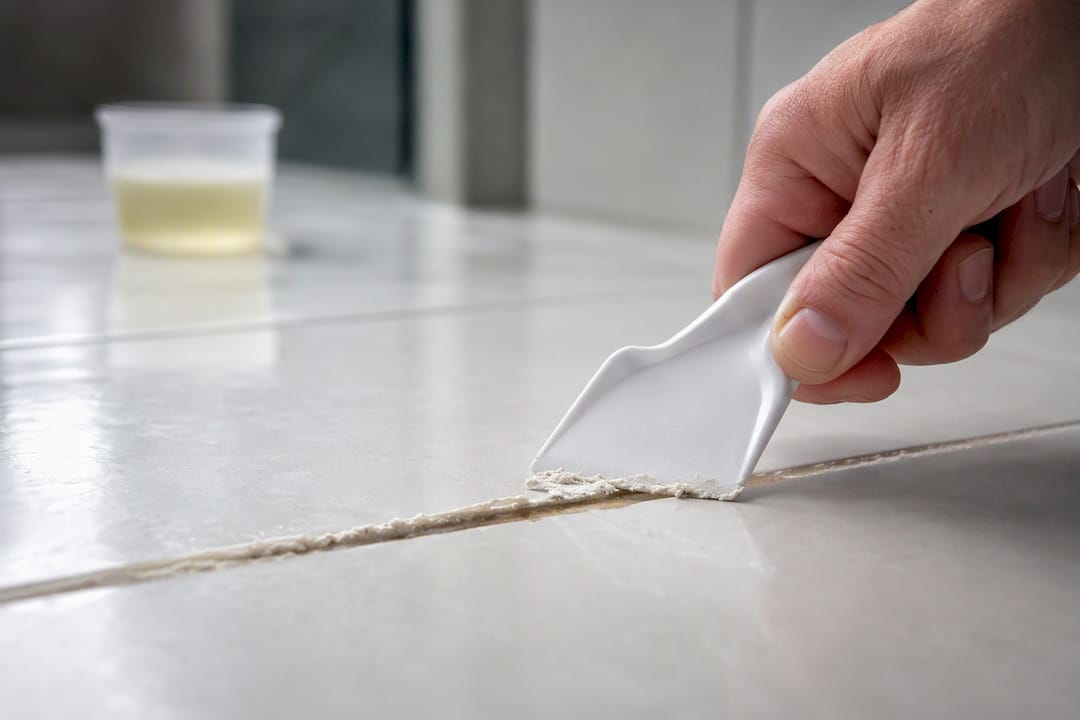
Grease and kitchen stains need alkaline degreasers, not acids, since fat and oil respond to alkaline chemistry the same way they do in dish soap. Follow with a warm water rinse, since warm water helps carry dissolved grease out of the porous grout rather than letting it resettle as the water cools.
Rust stains, usually from a dropped can or a leaking pipe fitting, need a specialty rust remover formulated for the purpose. General cleaners won't touch rust because it's a different chemical reaction entirely. If rust has actually corroded into the grout or nearby metal fixtures, that's a repair job, not a cleaning one.
- Mold/mildew: oxygen bleach paste, 15 to 20 minute dwell, ventilate and rinse
- Hard-water/limescale: limited acid use on safe tile only, plus mechanical scraping
- Grease: alkaline degreaser, warm water rinse
- Rust: specialty rust remover, or replacement if corrosion has set in
Pro Tip: If black mold keeps returning to the exact same spots within a few weeks of cleaning no matter what you use, that's usually not a cleaning problem anymore. It's a sign the grout has failed and mold has worked into cracks below the surface, which cleaning products can't reach.
How do you keep grout clean once it's done?
The cleaning work only holds if you follow it with a few habits and, in wet areas, sealing.
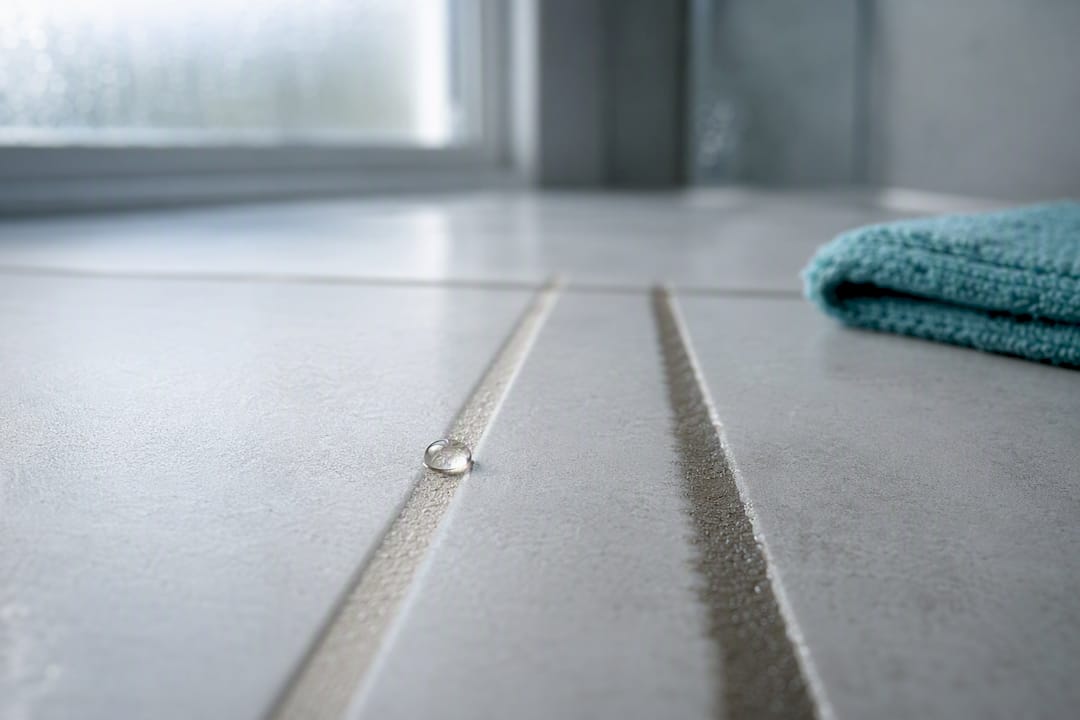
Sealing matters more in bathrooms than anywhere else in the house. Grout sealer fills the porous surface so moisture and grime can't soak in the way they do with bare grout. In high-moisture zones like showers, reseal every 6 to 12 months. You can test whether grout still holds a seal by dripping a little water on it: if it beads up, the seal's intact; if it soaks in within a minute or two, it's time to reapply.
Daily and weekly habits do more than any deep clean. Squeegee shower walls after every use to cut down on standing moisture. Running the bathroom exhaust fan for a sufficient duration after a shower measurably reduces the moisture that speeds mold regrowth, which is one of the cheapest maintenance habits available since it costs nothing but a little patience before you turn the fan off. Wipe up spills on kitchen floors right away instead of letting them sit, and stick to pH-neutral cleaners for routine wiping rather than anything acidic or heavily oiled.
Frequency depends on the room. Shower walls benefit from a real scrub every one to two weeks, since that's roughly how fast soap scum and body oil build back up. Floors in low-traffic areas can go monthly to quarterly for a deep pass, though high-traffic kitchen and entryway floors need attention closer to monthly.
- Reseal grout in wet areas every 6 to 12 months
- Squeegee shower walls after each use
- Run the exhaust fan 20+ minutes post-shower
- Wipe kitchen spills immediately, use pH-neutral cleaners for routine wiping
- Deep clean shower grout every 1 to 2 weeks; floors monthly to quarterly
One habit worth dropping entirely: oil-based or wax-based floor cleaners. They leave a film that traps dirt on contact, which means the floor looks clean for a day and then re-soils faster than if you'd used nothing at all.
When should you call a professional grout cleaner?
Some grout problems are cleaning problems. Others are repair problems wearing a cleaning problem's disguise, and knowing the difference saves you from repeating the same failed effort for months.
Crumbling or powdery grout that comes away when you scrub it isn't dirty, it's failing structurally, and no cleaner fixes that. Mold that returns within a few weeks of a thorough clean, more than once, usually means it's gotten into cracks below the visible surface. Persistent musty odor with no visible source often points to the same hidden mold problem. And sometimes it's simply scale: a whole-house floor or a large commercial-style kitchen is more square footage than most people want to hand-scrub on a weekend.
Professionals bring equipment and process advantages that don't exist at consumer scale. No-touch spray-and-vac systems flush and extract grout lines in one motion rather than pushing dirty water around with a mop. Industrial steam reaches temperatures well above consumer units. And when grout has genuinely failed, professionals can remove and replace it, then seal the new grout properly, something TCNA notes should be done carefully to avoid damaging surrounding tile.
Hiring makes sense when the time cost of DIY outweighs the price, when the area is large enough that consumer tools genuinely can't keep pace, or when mold recurrence suggests a health consideration rather than a cosmetic one. Before hiring anyone, ask what products and methods they use, whether they guarantee results, and how they handle natural stone if you have any in the home.
- Crumbling, powdery, or missing grout in sections
- Mold that returns repeatedly after proper cleaning
- Persistent musty odor with no visible cause
- Large floor area where consumer tools can't keep pace
- Natural stone tile requiring specialized, non-acidic products
What does an experienced cleaning team actually check that homeowners miss?
Grout looks like a cleaning problem. In practice, it's a moisture management problem that happens to show up as staining, which is why the fix that lasts involves more than a good scrub.
Cleaning.Miami runs eco-friendly cleaning and maid services across Miami-Dade County, and Miami's climate is exactly why moisture control gets treated as seriously as the scrubbing itself. High humidity and salt air both accelerate the exact conditions that make grout stain, mildew, and break down faster than in drier climates. Every team is background-checked, insured, and bonded, and every booking is backed by a 100% satisfaction guarantee, with scheduling built to take under 60 seconds online at Cleaning.
The single most missed step in home grout care isn't the scrubbing, it's the drying. Running an exhaust fan for a full 20 minutes after every shower does more to prevent mold from coming back than any cleaner on the market. Most callbacks for recurring mold happen in bathrooms with weak or unused ventilation, not bad cleaning technique.
Busy professionals, families, and Airbnb hosts often rely on this kind of attention for a reason: a rental turnover with mildewed shower grout is a bad review waiting to happen, and it's usually preventable with the right routine.
Why most grout advice skips the one thing that actually determines whether it works
The internet's grout advice tends to focus on the paste recipe and skip the two things that decide whether any of it holds: matching chemistry to the actual stain, and drying the area completely afterward. People blame a "bad cleaner" when the real failure was using an acid on cementitious grout, or sealing over grout that was still damp underneath.
If there's one piece of conventional wisdom worth pushing back on, it's the idea that a stronger product always means a better result. Oxygen bleach outperforms chlorine bleach on mold not because it's harsher, but because it works differently at a molecular level. That distinction, chemistry over strength, is the whole game.
Prioritize the boring stuff first: proper dwell time, the right cleaner family, and a fan running longer than feels necessary. Skip that, and no brush or paste recipe will make the fix stick.
— Erik
Ready to skip the scrubbing? Here's how Cleaning.Miami helps
DIY grout cleaning solves most everyday staining if you've got an hour, the right paste, and patience for the dwell time. Where it stops making sense is large-scale jobs, recurring mold that keeps beating your best efforts, or a move-out deadline that doesn't leave room for trial and error.

Cleaning.Miami handles the jobs where DIY hits its limit: full deep cleans, move-in and move-out turnovers, and vacation rental resets between guests, all with eco-friendly products suited to Miami's humidity and salt air. Booking takes under 60 seconds online. If persistent mold, a large surface area, or a tight turnover deadline has you weighing DIY against hiring, start with the house cleaning services page to see what a full booking includes, or check what a house cleaner won't do if you're not sure grout work falls inside the scope of a standard visit.
Sources
- Cleaning Grout | Tile Council of North America
- Easy steps to clean and restore tile grout | Popular Mechanics
- How to clean and restore tile grout | The Spruce
- How to clean grout like a pro: Expert tips and what to avoid | Tom's Guide